Why sautéing first transforms electric pressure cooking
The sauté before pressure cooking technique is the single upgrade that shifts your electric pressure cooker from merely convenient to genuinely impressive. When you use the built in saute function properly, the pot reaches temperatures high enough for deep browning, which means your food develops complex flavours instead of tasting flat or boiled. Treat this step as non negotiable for most savoury recipes, because it lays down the flavour foundation that pressure cooking alone cannot build.
On modern multi cookers such as the Instant Pot Duo 5.7 litres, the saute function can typically push the bottom pot surface well above 150 °C and, in independent home tests with infrared thermometers on several Instant Pot and similar models, often into the 170 °C range. That is firmly in the Maillard reaction zone where proteins and sugars reorganise into a wide spectrum of new aromatic compounds. A quick pot saute of onions, garlic, and tomato paste before you add liquid turns basic pot meals into something closer to a slow simmered stew from a traditional stove. You still get the speed of pressure cooking, but the taste profile leans toward restaurant style braising rather than weeknight compromise.
Think of the inner pot as both a skillet and a pressure cooker, because the best instant results come when you use both roles in sequence rather than only one. You tap the saute button, heat a thin film of oil until it shimmers, then brown your chicken thighs or vegetables in batches so they cook evenly and do not steam. Only after that do you add the main cooking liquid, lock the lid, and let pot pressure do the tenderising work while the browned fond on the bottom pot dissolves into the sauce.
The science behind the sauté before pressure cooking technique
At its core, the sauté before pressure cooking technique is about controlling heat in two distinct phases. During sauteing, the pot cook surface is dry enough for browning, while during pressure cooking the environment becomes saturated with steam, which is excellent for tenderness but terrible for crust. Using the saute function first lets you capture both benefits in a single recipe without dirtying an extra pan on the stove.
Most electric pressure cooker models reach around 170 to 175 °C on high saute, which is above the 140 °C threshold where the Maillard reaction really accelerates and creates that sticky brown fond on the bottom pot. Those browned bits are not burnt leftovers; they are concentrated flavour that will dissolve when you add liquid, turning even easy recipes into something that tastes like it simmered for hours. Pressure then takes over, driving moisture and dissolved aromatics into the food much faster than a slow cooker could manage in the same time.
Because the pot is enclosed, any fat or juices released during sauteing stay in the cooker instead of splattering across your kitchen, which is one reason busy home cooks tend to use the Instant Pot style multi cooker more often than a separate skillet. If you are interested in precise temperature control for delicate proteins, pairing your pressure cooker with an immersion circulator and following a guide to immersion cooker mastery for sous vide can give you even more control, while still letting you finish with a quick pot saute. Either way, the science stays the same, because high dry heat builds flavour and moist high pressure finishes the cooking efficiently.
The three minute sear protocol for better pot recipes
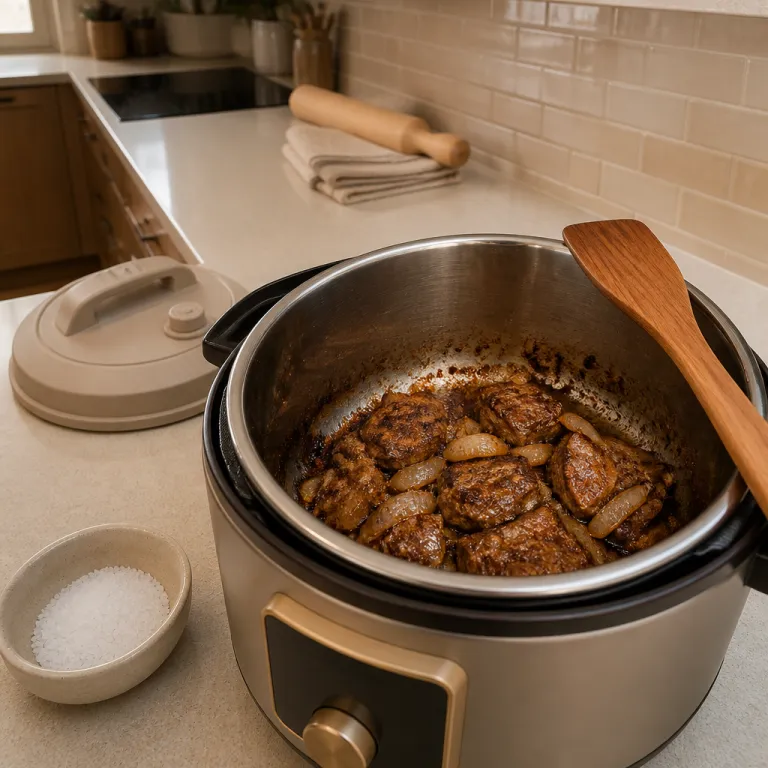
To make the sauté before pressure cooking technique practical on a weeknight, you need a repeatable routine rather than a vague idea of browning. Start by patting your chicken thighs or other protein very dry, because surface moisture will steam instead of sear and can trigger a pot burn warning if it mixes with starch on the bottom pot. Set the saute function to high, add one to two tablespoons of oil, and wait until the oil moves freely and just begins to smoke before you lower in the meat.
For most cuts, three minutes per side is enough, and you should resist the urge to move the pieces around, because undisturbed contact is what creates that deep golden crust that pressure cooking will later soften into a rich sauce. If you are short on time, brown only one side of each piece; tests on various Instant Pot and similar electric pressure cooker models show that searing a single side still delivers most of the flavour benefit while cutting active time nearly in half. Once the meat is browned, remove it briefly, use the saute button to keep the heat on, and saute onions, garlic, or spices directly in the rendered fat to build another layer of flavour.
After sauteing the aromatics, you must deglaze, which means you add a measured amount of liquid such as stock, wine, or water and scrape the bottom pot thoroughly with a wooden spoon until no browned bits remain. This step both prevents a burn message during pressure cooking and turns the fond into the backbone of your sauce, so skipping it is never a good idea. For more detail on how a dedicated pan can complement this process, see this guide on how a sauté pan elevates everyday cooking while still letting the pressure cooker handle the heavy lifting.
Which recipes gain most from sautéing before sealing the cooker
Not every recipe needs the sauté before pressure cooking technique, but most savoury dishes improve dramatically when you use it. Stews, curries, braised meats, and bean based pot meals all benefit from a strong initial sear, because the browned surfaces and deglazed fond give body to the cooking liquid and keep the final food from tasting thin. Classic pot recipes such as beef bourguignon, chicken thighs in tomato sauce, or lentil soups respond especially well to a thorough pot saute of aromatics and tomato paste before you add stock.
Soups that start with onions, carrots, and celery are another ideal match for the saute function, since sweating and lightly browning those vegetables in the cooker concentrates their sweetness in a way that a slow cooker on low heat rarely achieves. When you then switch to pressure cooking, the trapped steam carries those flavours deep into every bean or grain, which is why recipes instant collections often call for both sauteing and pressure phases. Even easy recipes like weeknight chilli or one pot pressure pasta taste more complex when you brown the meat and toast the spices first.
There are times to skip searing, especially when you want a very clean broth or a light steamed texture, such as plain rice, bone broth, or delicate fish cooked on a rack above the liquid. In those cases, using the saute button only briefly to bloom spices or melt butter is enough, and you can rely on gentle pot pressure to cook everything evenly without extra colour. If you want to keep your kitchen cooler while still getting these layered flavours, pairing this method with strategies from a guide on summer meal prep that keeps your kitchen cool can make the pressure cooker your main warm weather tool.
Preventing burn messages and other real world kitchen tips
One concern many Instant Pot owners share is the dreaded burn message, which usually appears when thick sauces or starches stick to the bottom pot during pressure cooking. The sauté before pressure cooking technique actually helps avoid this, as long as you deglaze properly and respect the minimum liquid requirements listed in your cooker manual, which typically recommends at least one cup of thin liquid for safe operation on many models. After you finish sauteing, always add enough thin liquid to fully dissolve any stuck bits and to create a buffer between the heating element and the food.
Think of the pot burn warning as a safety feature rather than a failure, because it tells you the cooker has detected hot spots where the temperature is climbing too high for safe pressure. To prevent it, avoid adding cream, cheese, or very thick tomato sauces before pressure comes up; instead, cook under pressure with thinner liquid, then stir in rich ingredients after you release pressure and switch back to the saute function. This two stage approach keeps your recipes flexible and lets you finish sauces to the exact thickness you want without fighting the electronics.
For busy home cooks, the real advantage of mastering this technique is that it turns one appliance into a full cooking system that can replace a separate stove, slow cooker, and even some oven tasks. You can start a batch of chicken thighs with a hard sear, pressure cook them in a fragrant broth, then use the saute button again to quickly reduce the liquid into a glossy glaze while the meat rests. Over time, these small kitchen tips add up, and the Instant Pot or any similar pressure cooker becomes less of a gadget and more of a weeknight workhorse that earns its space on your counter.
FAQ: sautéing and pressure cooking in one pot
Should I always use the sauté function before pressure cooking ?
You do not need to use the sauté function for every recipe, but most savoury dishes taste better when you do. Use the sauté before pressure cooking technique for stews, curries, braises, and soups with aromatics, where browning adds depth. Skip or minimise it for plain rice, bone broth, or very delicate fish where a clean, light flavour is the goal.
How much liquid should I add after sautéing to avoid a burn message ?
As a rule, add at least 250 millilitres of thin liquid after sauteing, unless your cooker manual specifies a different minimum for your specific model. Make sure you scrape the bottom pot thoroughly to dissolve all browned bits before sealing the lid. Thicker sauces can be added later, after pressure cooking, while you reduce the liquid on saute.
Can I use the sauté before pressure cooking technique with frozen meat ?
Searing works best on thawed meat, because frozen surfaces release too much water and prevent proper browning. If you must cook from frozen, pressure cook the meat first with enough liquid, then use the saute function afterward to reduce the sauce and add flavourful ingredients like tomato paste or spices. This reversed order still improves taste, even if you cannot fully brown the meat.
What is the best way to brown chicken thighs in an electric pressure cooker ?
Dry the chicken thighs very well, season them, then heat oil on high saute until it shimmers. Brown the pieces in a single layer for about three minutes per side without moving them, working in batches if necessary so you do not crowd the pot. Remove the browned chicken, saute aromatics in the rendered fat, deglaze with liquid, then return the meat and start pressure cooking.
Why does my food sometimes taste bland even when I pressure cook it correctly ?
Pressure cooking alone excels at tenderness but not at browning, so dishes can taste flat if you skip the initial saute. Using the sauté before pressure cooking technique builds a base of caramelised flavours that the pressurised liquid then carries into the food. Seasoning generously and reducing the sauce briefly on saute after pressure release will further concentrate taste without adding extra salt.