Why pressure cooker international recipes birria dal belong in your weeknight rotation
Electric pressure cookers shine when you push them beyond basic stews and plain rice. They turn long-simmered international dishes like birria, dal, and ramen into realistic weeknight projects instead of all-day kitchen commitments. That shift matters for any busy home cook who wants real flavor without surrendering an entire evening.
Think about traditional birria, slow-simmered lentil dal, or pork bone ramen broth on a normal Tuesday. Each classic recipe usually demands hours of steady heat, constant checking, and a pot that hogs the stove. With a modern electric pot, the same meat, lentils, and bones reach deep flavor in a fraction of the time you would expect.
Pressure cooking traps steam, raises boiling temperature, and accelerates the cooking process. That sealed environment keeps broth aromas and spice oils inside the pot instead of drifting through the kitchen air. The result is concentrated flavor in your birria sauce, dal, or ramen-style broth, with less evaporation and less risk of scorching.
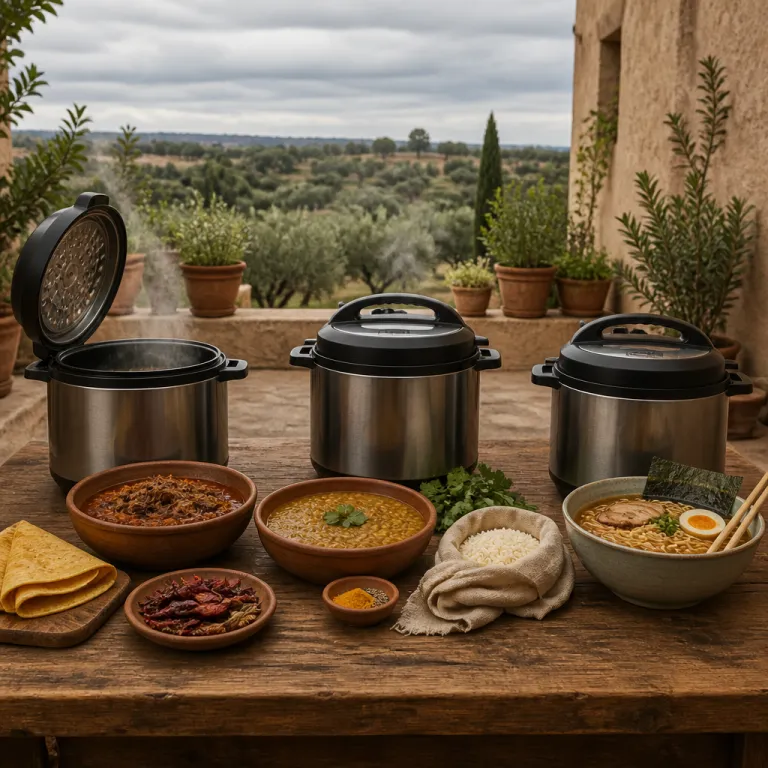
For this guide, I cooked through birria, dal, and ramen broth on two workhorse models. The Instant Pot Duo 6 litre and the Ninja Foodi 7.5 litre both handled beef, lentils, and pork bones reliably, though the Ninja browned meat better. What follows is not restaurant theater but practical recipes and techniques tuned for a working parent who needs predictable prep time and easy servings prep.
Electric pressure cooker birria tacos: from beef to cheesy tortilla birria
Birria started as a traditional stew from Jalisco, usually made with goat or lamb. At home, beef is easier to find and more forgiving in an electric pot, especially cuts like beef cheeks or chuck that love long, moist heat. In testing, 45 minutes at high pressure with about 1 teaspoon of kosher salt per pound of meat gave fall-apart beef that shredded cleanly for birria tacos without turning stringy.
Ingredients for about 12 birria tacos
- 3 lb (about 1.4 kg) beef cheeks, chuck roast, or short ribs
- 4–6 dried Mexican chiles (such as guajillo or ancho)
- 1 medium onion, sliced
- 3–4 cloves garlic
- 2–3 tbsp vinegar (white or apple cider)
- 3–4 cups (700–950 ml) beef broth or water
- 3 tsp kosher salt (about 1 tsp per pound of meat), plus more to taste
- Corn tortillas and shredded melting cheese for serving
Step-by-step method
- Use the sauté function on medium heat to brown the beef in batches. This first step builds a meat sauce fond on the bottom of the pot, which later enriches the birria sauce and the consomme-style broth you will use for dipping.
- Remove beef pieces to a plate. Add sliced onion, garlic, and dried Mexican chiles to the same pot. Let them soften over medium heat, then add spices if using, vinegar, and enough broth or water to loosen the browned bits.
- For a typical 3 pound (about 1.4 kg) batch, use 4 to 6 dried chiles, 3 to 4 cloves of garlic, 1 medium onion, and 2 to 3 tablespoons of vinegar. Blend this mixture into a smooth birria sauce, return the shredded beef or whole pieces to the pot, and lock the lid for the main cooking process.
- Cook 45 minutes at high pressure, then let the cooker release pressure naturally for 10 to 15 minutes. Open the lid, check seasoning, and adjust salt if needed.
After the pressure cycle and a short natural release time, you will have tender meat in a rich red broth. Skim some fat from the surface and reserve it in a small sauce place for later, because that chile-stained oil is what makes tortilla birria crisp and golden. The remaining liquid becomes your consomme for serving, and it is where the pressure cooker really concentrates flavor.
To assemble birria tacos, dip tortilla edges lightly into the reserved birria fat, then lay them in a hot pan. Add a small pile of shredded beef, a sprinkle of cheese melted to your taste, and fold the tortilla over while it fries. When both sides are crisp and the cheese melted fully, serve with cups of hot consomme, lime wedges, and chopped onion for dipping and contrast.
For a busy cook, the key metrics are prep time and total time from fridge to table. Expect about 20 minutes of active prep for trimming meat, toasting chiles, and blending the sauce, then 45 minutes under pressure plus resting. That means birria recipe nights can fit between work and bedtime, especially if you batch cook and freeze extra shredded beef and broth for future recipes.
If you already rely on fast weeknight taco recipes, you can slot this into your rotation next to quicker options like these eight minute chicken tacos in the pressure cooker. Birria tacos will never be as fast as chicken, but the electric pot narrows the gap enough to make them realistic. The payoff is a Mexican-style dinner that tastes like a weekend project but behaves like a weeknight recipe.
Dal in the pressure cooker: lentils, tadka, and real weeknight speed
Where birria leans on beef and chiles, dal leans on lentils, aromatics, and a final tempered oil called tadka. These international recipes work so well in a pressure cooker because dried legumes thrive under pressure, softening in minutes instead of nearly an hour on the stove. For a working parent, that time savings is the difference between cooking dal from scratch and defaulting to takeout.
Ingredients for 4 servings of red lentil dal
- 1 cup (about 200 g) red lentils (masoor dal), rinsed
- 3 cups (about 700 ml) water or light vegetable broth
- 1/2 teaspoon turmeric
- 1 teaspoon kosher salt, plus more to taste
- 1 small onion, chopped
- 1 medium tomato, chopped
Tadka (tempered oil)
- 1–2 tablespoons ghee or neutral oil
- 1 teaspoon cumin seeds
- 1/2 teaspoon mustard seeds
- 2–3 cloves sliced garlic
- 1–2 dried chiles
Red lentils, also called masoor dal, are the most beginner-friendly option for an electric pot. Rinse them well, then add them to the pot with water or light vegetable broth, turmeric, salt, chopped tomato, and onion. For 1 cup (about 200 g) of lentils, use 3 cups of liquid, 1/2 teaspoon of turmeric, 1 teaspoon of kosher salt, 1 small chopped onion, and 1 medium tomato. Set the cooker for about 10 to 12 minutes at high pressure, depending on how soft you like the final texture, then let the pressure drop naturally for another 5 minutes.
While the dal cooks, you prepare the tadka in a small pan over medium heat. Warm 1 to 2 tablespoons of ghee or neutral oil, then add 1 teaspoon of cumin seeds, 1/2 teaspoon of mustard seeds, sliced garlic, and dried chiles until fragrant and just starting to darken. This quick sauce adds a layer of toasted spice flavor that pressure alone cannot create, and it is poured over the cooked dal right before serving.
When you open the pot, the lentils should be soft enough to whisk into a creamy base. Taste and adjust salt, then add the hot tadka, letting it sizzle across the surface before stirring it in. That contrast between mellow lentils and sharp, fresh spices is what makes dal feel complete, even though the active cooking process took only a handful of minutes.
From a nutrition standpoint, dal recipes are efficient in both calories and protein. A typical serving of red lentil dal sits around 200 to 250 calories, depending on how much ghee you add in the tadka, based on standard lentil nutrition data. Paired with rice or flatbread, it becomes a full meal that is lighter than birria tacos but just as satisfying on a cold night.
These pressure-cooked lentil dishes also highlight how different cultures treat this appliance. In many Indian households, pressure cookers are daily tools for dal, beans, and rice, not novelty gadgets. Bringing that mindset into your own kitchen means using the pot for simple, repeatable recipes, not just occasional showpiece meals.
If you like to batch cook, dal holds well in the fridge and reheats smoothly with a splash of water. You can portion it into containers or even into pint jars, taking a cue from how pint canning jars quietly organize modern kitchens. That way, a single pressure cycle on Sunday can cover several quick lunches or side dishes across the week.
Ramen style broth under pressure: from pork bones to weeknight bowls
Traditional tonkotsu ramen broth is famous for its milky, collagen-rich texture and deep pork flavor. On the stove, cooks often boil pork bones hard for half a day or more, skimming and topping up water as the broth reduces. An electric pressure cooker compresses that entire cooking process into roughly 90 minutes while still extracting plenty of collagen and flavor.
Start by blanching pork bones briefly in boiling water on the stove, then rinsing them to remove impurities. Transfer the clean bones to the pressure cooker pot with onion, garlic, ginger, and a piece of kombu if you have it, then add enough water to cover by a few centimetres. For every 2 pounds (about 1 kg) of bones, add roughly 2 teaspoons of kosher salt to the pot as a starting point. Lock the lid, set the cooker to high pressure for about 60 to 90 minutes, and let it release naturally for the creamiest broth.
Because the pot is sealed, you lose far less liquid to evaporation than in a traditional stockpot. That means the broth that comes out is already concentrated, with a texture that often looks slightly opaque and a mouthfeel that coats the lips. If you want it even richer, you can run a second shorter pressure cycle after adding more bones or simmer it uncovered on medium heat to reduce.
Once strained, this broth becomes the base for countless ramen recipes and noodle soups. Season it with soy sauce, miso, or a simple salt tare, then add cooked noodles, sliced meat, and vegetables right before serving. While it is not a classic Mexican consomme or a birria sauce, the same pressure principles that help birria tacos also help ramen reach depth quickly.
For a busy household, the smart move is to treat ramen broth like a batch project. One large pressure cooker session yields several litres of broth, which you can cool, portion, and freeze for future recipes. That way, the long cooking time of the initial session pays off across many fast dinners where you only need to reheat and assemble.
Compared with birria or dal, ramen broth is heavier in calories per serving, especially once you add noodles and toppings. A typical bowl can easily reach 500 to 700 calories, depending on how much fat and meat you include, based on common ramen nutrition estimates. That is not a problem on its own, but it is worth balancing across your weekly meal plan if you are watching energy intake.
Putting birria, dal, and ramen side by side shows three very different ways to use the same appliance. One pot handles beef for tacos, lentils for dal, and pork bones for broth without changing hardware, only settings and time. The more you rotate through these recipes, the more your pressure cooker earns its counter space as a true international tool.
Step by step: timing, prep, and the real cooking process
When you are juggling work, family, and dinner, timing matters as much as taste. For each of these global pressure cooker recipes, it helps to break the cooking process into clear blocks. Think in terms of prep time, pressure time, and finishing steps, rather than one vague total.
For birria recipe nights, plan roughly 20 minutes of prep time for trimming beef, toasting chiles, and blending the sauce. The pressure phase usually runs 45 minutes at high pressure, followed by 10 to 15 minutes of natural release time before you safely open the pot. Shredding the meat, crisping tortilla birria, and melting cheese on the stovetop adds another 10 to 15 minutes, depending on how many tacos you are making.
Dal is faster, which is why it is ideal for weeknights when you are already tired. Rinsing lentils, chopping onion, and measuring spices takes about 10 minutes, and the pressure cycle is often just 10 to 12 minutes. While the pot works, you prepare the tadka in a separate pan, so the total time from start to bowl can land under half an hour.
Ramen broth is the outlier, because the pressure time is long even if the active work is short. Expect 15 to 20 minutes of prep time to blanch bones, chop aromatics, and load the pot, then 60 to 90 minutes under pressure. The reward is several meals worth of broth, so the servings prep payoff is spread across multiple nights.
Across all three recipes, the sauté function is your best friend for building flavor. Browning beef for birria, blooming spices for dal, or lightly toasting aromatics for ramen all happen in the same pot, which means fewer dishes and less cleanup. Just remember to scrape up any browned bits with liquid before sealing the lid, so nothing burns during the pressure phase.
Another practical detail is how you handle meat after cooking. For birria tacos, you remove beef from the pot while it is still hot, then shred it with forks or tongs before returning some of it to the sauce. Leaving the meat in large chunks makes it harder to stuff into tortilla birria, and you miss out on the way shredded beef soaks up broth and spices.
Readers often leave comments asking whether they can stack recipes in one session, such as cooking dal above birria in a steamer basket. Technically, you can, but the flavors will mingle in ways that do not flatter either dish, especially with strong birria sauce and chiles. A better strategy is to batch cook one recipe at a time and freeze portions, so you always have at least one international option ready for a low energy night.
Balancing flavor, nutrition, and calories in pressure cooked meals
Pressure cooking changes how flavors behave, and that matters when you adapt international recipes. In a sealed pot, volatile aromas stay in the broth instead of escaping, which makes spices and meat taste more intense. That is why birria sauce, dal, and ramen broth often seem richer from the pressure cooker than from a casual stovetop simmer.
For birria tacos, the concentrated consomme can border on salty if you season aggressively at the start. A safer approach is to salt lightly before pressure cooking, using about 3/4 to 1 teaspoon of kosher salt per pound of meat, then adjust the broth after you open the pot and taste. The same logic applies to ramen broth, where soy sauce and miso should be added gradually to avoid overshooting your preferred flavor level.
Dal behaves a little differently, because lentils absorb both water and seasoning as they cook. If you under season at the start, the final dish can taste flat even if you add salt later, since the interior of each lentil remains bland. A good compromise is to season the cooking liquid modestly, then rely on the tadka to bring a final punch of spice and aroma.
From a nutrition angle, these three recipes cover a wide range of calories and macronutrients. Birria tacos with cheese melted into each tortilla and a generous dip tortilla ritual in consomme will land on the higher end of the calorie spectrum. Dal sits in the middle, especially if you go easy on ghee, while ramen bowls can swing high or moderate depending on how much fat you skim from the broth.
These pressure cooker meals also let you control fat in ways that restaurant versions rarely do. When the pot cools slightly, fat rises to the top of the broth, where you can skim and reserve it for targeted use. For example, you might keep a few spoonfuls of birria fat for crisping tortillas while discarding the rest to lower overall calories per serving.
Acidity and freshness are your allies when dealing with rich meat dishes. Lime wedges alongside birria tacos cut through the meat sauce and cheese, while a squeeze of lemon over dal brightens earthy lentils. For ramen, a handful of sliced scallions or a spoonful of pickled vegetables can keep the bowl from feeling heavy halfway through.
Finally, think about how these recipes fit into your weekly rhythm rather than judging each one in isolation. Maybe birria tacos with shredded beef and cheese melted into every tortilla are a Friday reward, dal is a midweek staple, and ramen is a once-a-month project. The point is not to chase perfection but to use your pressure cooker as a flexible tool that supports how you actually eat.
Choosing and using an electric pressure cooker for global recipes
Not every electric pressure cooker handles birria, dal, and ramen equally well. When you cook beef for birria tacos, lentils for dal, and pork bones for broth, you quickly notice which models brown evenly and which struggle. In long term testing, the Instant Pot Duo handled timing and safety reliably, while the Ninja Foodi seared meat more aggressively thanks to a stronger heating element.
For birria and other meat-heavy recipes, prioritize a cooker with a strong sauté mode and a stainless steel pot. Nonstick inserts make it harder to build the browned bits that turn into flavorful sauce, and they can wear down under repeated high heat. A 6 litre capacity is enough for most families, but if you plan to batch cook ramen broth or large servings prep of dal, a larger pot gives you more flexibility.
Dal and other legume recipes benefit from precise control over time and pressure levels. Look for models that let you adjust both, rather than only offering vague presets like "bean" or "stew". Clear, readable displays and intuitive buttons matter more in daily use than extra modes you will rarely touch.
Safety is non negotiable when you are working with sealed steam and high heat. Modern cookers include multiple safety valves and lockouts, but you still need to respect fill lines, especially when cooking foamy foods like dal or starchy ramen noodles. Never exceed the maximum line, and leave extra space when you know a recipe will bubble vigorously under pressure.
Cleaning and maintenance also affect how often you actually use the appliance. Removable silicone gaskets, dishwasher safe pots, and simple lids make it easier to move from birria one night to dal the next without lingering smells. If your gasket holds onto strong birria sauce aromas, consider keeping a second gasket for neutral recipes like plain broth or desserts.
As you gain experience, you will start to adjust recipes based on your specific cooker and your taste. Maybe you prefer your shredded beef slightly firmer for tacos, so you shave five minutes off the pressure time, or you like your dal looser and add an extra cup of water. Those small tweaks are where the appliance stops feeling like a gadget and starts feeling like part of your cooking style.
In the end, the value of an electric pressure cooker is not measured by how many presets it offers. It is measured by how often you reach for it to make real food, whether that is birria tacos with lime wedges, a simple pot of dal, or a freezer stash of ramen broth. The goal is not the feature count, but the Tuesday night dinner that actually gets cooked.
Key figures that show why pressure cookers matter for global recipes
- Search interest for birria tacos and related recipes has surged into the hundreds of thousands of monthly searches, according to public keyword tools, reflecting how a once regional Mexican dish has become a mainstream home cooking project.
- Dried lentils for dal typically cook in 10 to 20 minutes under pressure, compared with 45 to 60 minutes on a stovetop, which cuts active kitchen time for legume based meals by roughly half.
- Traditional tonkotsu ramen broth often simmers for 12 to 18 hours on the stove, while an electric pressure cooker can extract similar collagen and flavor in about 45 to 90 minutes at high pressure.
- Modern electric pressure cookers usually operate at around 115 to 120 degrees Celsius under high pressure, compared with 100 degrees Celsius for a normal boil, based on typical manufacturer specifications, which is why they accelerate the cooking process so dramatically.
- In many Indian households, pressure cookers are used daily for dal and rice, while in North America they are still more likely to be used weekly, showing how cultural habits shape appliance value.
FAQ about pressure cooker birria, dal, and ramen
Can I cook birria, dal, and ramen broth in the same pressure cooker?
Yes, you can cook all three recipes in the same electric pressure cooker as long as you clean the pot and gasket thoroughly between uses. Strong flavors from birria sauce and pork broth can linger, so consider keeping a spare gasket for more neutral recipes. Using stainless steel rather than nonstick also helps prevent long term odor absorption.
How do I prevent my dal from foaming and clogging the valve?
To reduce foaming when cooking dal, avoid filling the pot above the recommended line for beans and legumes. Add a spoonful of oil to the cooking liquid, and do not use quick release immediately after the timer ends, since a short natural release helps foam settle. If your model allows, use a slightly lower pressure setting and a few extra minutes of time.
What beef cuts work best for pressure cooker birria tacos?
Beef cheeks, chuck roast, and short ribs all work well for pressure cooker birria because they contain enough connective tissue to become tender under pressure. Lean cuts like sirloin tend to dry out and shred poorly, even in a moist environment. Aim for well marbled meat and trim only thick surface fat, leaving some to enrich the consomme.
Can I make vegetarian versions of these recipes in a pressure cooker?
Dal is naturally vegetarian and adapts easily to vegan diets if you use oil instead of ghee in the tadka. For birria style tacos, you can pressure cook jackfruit or hearty mushrooms in a similar chile sauce, though the texture will differ from shredded beef. Ramen broth can be built on kombu, dried mushrooms, and aromatics instead of pork bones, with pressure helping extract depth from plant based ingredients.
How far in advance can I prepare these dishes for meal prep?
Birria and ramen broth both keep well in the fridge for three to four days and freeze for several months if cooled quickly and stored in airtight containers. Dal holds in the fridge for three days and may thicken, so plan to add a splash of water when reheating. For best texture, assemble tacos and noodle bowls right before serving, using reheated fillings and broth.