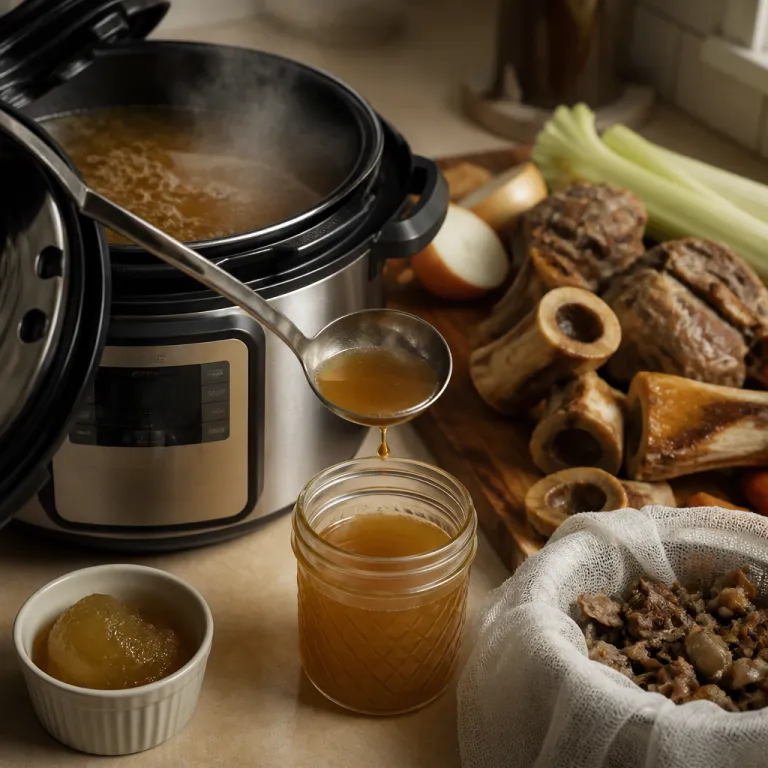
Why pressure cooker bone broth changes the rules
Bone broth used to mean a pot simmering for an entire weekend. With an electric pressure cooker, the pressure cooker bone broth benefits arrive in roughly two to four hours instead, while still giving you a collagen rich, gently wobbly gel. That time shift alone will turn bone broth from a rare project into a weekly habit for any meal prep focused cook.
The science supports this shortcut, especially for beef and mixed beef–chicken batches. In a 2017 paper in the Journal of Agricultural and Food Chemistry (Nakamura, Y.; Okuda, K.; Takahashi, T.; doi:10.1021/acs.jafc.7b01076), researchers reported that pressure boiling beef bones for about two hours extracted more gelatin than several longer cooking conditions. That suggests the right electric pot settings and timing can give you excellent texture without babysitting a stove. Push far past that window and the collagen gradually breaks down into smaller peptides again, so longer is not always better when you are making homemade broth in a sealed pot.
For health conscious readers, the nutritional profile is straightforward and modest. Based on typical lab analyses and nutrition databases for unsalted homemade stock, a representative cup of bone broth contains roughly 40 to 60 calories, about 7 to 10 grams of protein, and in the neighborhood of 250 to 300 milligrams of potassium, which makes it a light but satisfying base for great food rather than a miracle cure. As Cleveland Clinic notes, bone broth is unlikely to be a silver bullet, and mineral content can vary widely, yet the benefits home cooks care about most are flavor, protein density, and how easily this homemade food slots into batch cooking.
Compared with a traditional stockpot, an electric pressure cooker traps both steam and volatile aromas. That sealed environment means the bones, meat scraps, and connective tissue stay fully submerged in hot water, so more gelatin dissolves into the liquid in less time. You also avoid the constant evaporation that can scorch a stovetop pot and concentrate sodium and chicken flavors too aggressively when a recipe calls for long simmering.
For a meal prep enthusiast, the biggest of all pressure cooker bone broth advantages is volume. One 6 to 8 liter electric pot can yield 8 to 12 cups of broth in a single cycle, enough to portion a cup of homemade stock into jars or silicone molds for weeks of cooking. That batch size turns bone broth into a building block for rice, soups, and sauces instead of a special occasion project that monopolizes your stove and your attention.

From chicken frames to beef shanks: choosing bones and ingredients
The bones you choose determine whether your broth sets into a good wobble or stays thin. For chicken, prioritize chicken frames, wings, and feet, because these pieces carry joints, cartilage, and a little meat that release plenty of collagen under pressure. For beef, mix marrow bones with knuckles and meaty shanks, since that combination of bones and meat gives both body and deep flavor.
Think of your ingredients list in three parts, starting with bones good for gelatin, then aromatic vegetables, and finally acid and seasonings. A basic recipe calls for about one kilogram of mixed bones to three liters of water, plus onions, carrots, and celery, which you can roast first if you want a darker, more assertive broth. Add a tablespoon of apple cider vinegar and let the bones soak in the cold water for thirty minutes before cooking, because that vinegar technique helps draw minerals from the bones regardless of whether you use a pressure cooker or a slow simmer.
Salt deserves special attention when you care about low sodium eating. I recommend leaving out salt entirely during pressure cooking, then seasoning each cup of homemade broth to taste when you use it, which keeps your base flexible for different recipes and sodium targets. If you are used to store bought stock, this unsalted approach may taste flat at first, but a pinch of salt at serving time will turn that neutral broth into something vibrant.
Many readers ask whether they can mix chicken and beef bones in one pot. You can, and the result is often a great food base for hearty soups, though the lighter chicken flavors may get overshadowed by beef fat and roasted notes. If you want a delicate sipping broth, keep chicken and beef separate, but for stews or pressure cooked tamales where broth is just one component, a mixed batch works well and saves freezer space.
Once you have your bones and vegetables ready, think about how you load the pot. Place the heavier beef bones or chicken frames at the bottom, then layer meat scraps and vegetables on top so steam can circulate, and avoid packing above the max fill line marked inside the pot. This careful pot arrangement prevents scorching, keeps pressure stable, and ensures that every piece of meat and bone stays fully covered in water during the cook.
For readers who are new to electric pressure cooking, mastering how to steam tamales in an Instant Pot for tender reliable results uses the same logic of layering and liquid management you apply to bone broth. Once you understand how ingredients, water level, and timing interact under pressure, you can move confidently between tamales, broth, and other beginner friendly recipes without feeling you need to skip the learning curve. That shared technique base is one of the quiet benefits homemade cooks gain when they commit to using their pressure cooker every week.

Two hours under pressure versus a 24-hour simmer
Long simmered bone broth has a certain romance, but the numbers favor pressure. On the stovetop, chicken bones often need 24 to 48 hours and beef bones can run 48 to 72 hours to reach a similar level of collagen extraction, which is simply not realistic for many home kitchens. Under high pressure, those same chicken bones yield a rich, jiggly broth in about two to three hours, while beef bones usually need three to four hours.
The Journal of Agricultural and Food Chemistry study on collagen extraction is especially revealing for anyone weighing pressure cooker bone broth benefits. Researchers found that pressure boiling beef bones for two hours produced the highest measured gelatin levels among the tested methods, and that cooking beyond that point gradually decreased collagen content, likely because the long heat exposure broke down the gelatin molecules. In practical terms, that means your electric pressure cooker can hit a sweet spot for texture and protein without tying up your stove or your attention for an entire day, though exact results will still vary with bone type and ratio.
There is one honest caveat, and it matters if you are chasing every possible micronutrient. Cleveland Clinic notes that bone broth, whether pressure cooked or simmered, is never going to be a silver bullet for health, and some minerals may require longer simmer times to fully leach from dense bones. If you want to hedge, you can run a first two hour pressure cycle for collagen, then reuse the same bones with fresh water for a gentler, longer stovetop simmer, combining the liquids for a hybrid approach.
From a flavor perspective, pressure cooking tends to produce a cleaner, more focused broth. Because there is no evaporation, you do not get the same Maillard driven caramelization on the surface that a 24 hour simmer might create, but you also avoid the risk of burnt bits clinging to the pot and lending bitterness, especially if you are not around to stir. You can mimic some of that roasted depth by browning the bones and vegetables directly in the pressure cooker on sauté mode before adding water.
Time saved is not just a convenience metric, it changes how you cook across the week. When you can turn a bag of frozen chicken frames and vegetable scraps into eight cups of broth between lunch and dinner, bone broth becomes as routine as cooking pressure cooker pasta done in the sauce with no boiling and no extra pot. That shift lets you build soups, risottos, and grain bowls around a flavorful, low sodium base instead of relying on store bought cartons that may not match your nutrition goals.
For batch cookers, the pressure method also reduces energy use and kitchen heat. Running an electric cooker for three hours draws far less power than keeping a gas burner at a bare simmer for a full day, and your kitchen stays comfortable enough for other tasks like prepping rice or vegetables. Over months of regular use, that efficiency becomes one of the quiet pressure cooker bone broth benefits that rarely shows up in marketing copy but matters to anyone watching both their utility bills and their time.

Step by step: an electric pressure cooker bone broth workflow
Think of this workflow as a template rather than a rigid script. Start by collecting bones from roasted chicken, beef roasts, or even pork, trimming off excess fat but leaving some meat attached for flavor, then freeze them in a labeled bag until you have enough for a full pot. When you are ready, skip any complicated prep and simply tip the frozen bones into the pot, no need to thaw.
For a standard 6 liter electric cooker, aim for about one and a half kilograms of mixed bones and meat scraps. Add two chopped onions, two carrots, two celery stalks, a bay leaf, and a teaspoon of whole peppercorns, then pour in enough cold water to cover everything by about three centimeters while staying below the max fill line. If your recipe calls for a more neutral broth for sipping, skip strong herbs like rosemary and thyme, which can dominate after hours under pressure.
Before sealing the lid, add one to two tablespoons of apple cider vinegar and let the mixture sit for thirty minutes. This brief soak helps draw minerals from the bones into the water, supporting one of the key pressure cooker bone broth benefits without adding any noticeable sourness to the final broth. Once the soak is done, lock the lid, set the valve to sealing, and program the cooker for 120 minutes at high pressure for beef or 90 minutes for chicken. On most countertop models, “high” corresponds to roughly 10–12 psi for electric multi-cookers and up to about 15 psi for stovetop pressure cookers, which is sufficient for good gelatin extraction.
When the timer ends, let the pressure release naturally for at least twenty minutes. A quick release can cause foaming and force fat and impurities into the valve, which is messy and can affect the clarity of your broth, so patience here pays off. After the pressure drops, open the lid away from you to avoid steam burns, then use a slotted spoon or tongs to remove the largest bones before straining the liquid through a fine mesh sieve.
Cooling and storage are where many home cooks lose quality. Transfer the strained broth into shallow containers to help it cool quickly, then refrigerate within two hours so the fat rises and solidifies on top, making it easy to lift off in a single piece if you prefer a lower fat broth. That chilled layer of fat can be saved for sautéing vegetables or cooking rice, turning what some see as waste into another small benefit homemade cooks appreciate.
Once chilled, portion the broth into jars, freezer safe containers, or silicone molds, leaving headspace for expansion. Label each container with the type of bones used, the date, and whether it is salted or low sodium, so future you does not have to guess, and aim to use refrigerated broth within five days or frozen broth within three months. This simple labeling habit supports your own interactions with your freezer inventory, because you can reply to your future self with clear information instead of mystery containers.

For safety and precision, be aware that bones can contain trace contaminants such as lead, and long cooked broths may concentrate histamine, which can bother sensitive individuals. If you have concerns about heavy metals, allergies, or histamine intolerance, talk with a healthcare professional before making bone broth a daily habit, and always follow your specific pressure cooker manual for fill limits, venting instructions, and safe pressure release.
Real world uses: from weeknight meals to pet bowls
Once you have a stash of bone broth, the question becomes how to use it often. The most obvious move is to swap broth for water when cooking rice or other grains, which instantly upgrades even plain rice into something closer to pilaf without extra effort. A single cup of homemade broth per cup of dry rice is usually enough, and the gentle savoriness means you can keep the rest of the dish low sodium without feeling deprived.
Soups and stews are the next logical stop, especially if you enjoy making homemade one pot meals in your electric cooker. Use your broth as the base for lentil soup, chicken vegetable stew, or a simple beef and barley pot, and you will notice how the gelatin rich liquid gives body without needing cream or large amounts of added fat. For busy nights, you can even skip browning and simply add chopped vegetables, leftover meat, and frozen peas to hot broth for a ten minute dinner.
Bone broth also shines in sauces and pan reductions. Deglaze a skillet of seared chicken thighs with a ladle of broth instead of wine, then simmer until slightly thickened and finish with a knob of butter for a quick pan sauce that clings beautifully, thanks to the gelatin. That same technique works with beef, where a splash of broth can pull up fond and turn it into a glossy coating for sliced meat.
Many readers ask about sharing bone broth with a dog, and here nuance matters. Plain, unsalted broth made from chicken or beef bones can be a tasty occasional treat for many dogs, but you must avoid onions, excessive fat, and any seasonings that might upset their digestion, so always check with your veterinarian before making homemade treats. If you plan to use broth for both human and pet bowls, keep one batch completely unsalted and onion free, then season individual portions for people at serving time.
For those who like to experiment, bone broth can even underpin simple pressure cooker meals beyond soup. Use it as the cooking liquid for pressure cooked potatoes, learning from guides on mastering how to pressure cook potatoes for perfect results every time, and you will get more flavorful mash or salad bases without extra ingredients. You can also use broth instead of water when cooking grains for meal prep bowls, which makes even a basic combination of rice, roasted vegetables, and shredded meat feel like great food.
Over time, you will develop your own recipe love list built around broth, from quick noodle bowls to braised greens. The key is to treat your freezer stash as a working pantry item, not a special occasion ingredient, and to keep making homemade batches whenever your bag of bones fills up. That rhythm is where the real pressure cooker bone broth benefits show up, not just in nutrition numbers but in how easily you can put satisfying, homemade food on the table.

FAQ
Does pressure cooking destroy collagen in bone broth ?
Current research suggests that pressure cooking does not destroy collagen when you keep cook times in the two to three hour range. In fact, a 2017 study in the Journal of Agricultural and Food Chemistry (Nakamura et al., doi:10.1021/acs.jafc.7b01076) found that pressure boiling beef bones for about two hours yielded the highest gelatin extraction among the tested methods. Cooking significantly longer than that can start to break down gelatin, so more time is not always better.
Is pressure cooker bone broth as nutritious as long simmered broth ?
Pressure cooked bone broth delivers broadly similar protein and collagen levels to long simmered versions when you use the right bones and timing. A typical cup contains around 40 to 60 calories, 7 to 10 grams of protein, and a useful amount of potassium, which makes it a solid base for healthy meals. Some minerals may be slightly lower than in very long simmered broths, and exact values vary with ingredients, but for most home cooks the tradeoff in time and energy is worth it.
How long should I cook chicken and beef bones under pressure ?
For chicken bones, 90 minutes at high pressure with a natural release usually gives a rich, gelatinous broth. Beef bones benefit from 120 minutes at high pressure, again followed by a natural release to keep the liquid clear and prevent foaming. These ranges balance collagen extraction with flavor development without overcooking the broth.
Can I use store bought rotisserie chicken bones for bone broth ?
Yes, you can use the carcass and bones from store bought rotisserie chicken to make broth in an electric pressure cooker. Remove most of the skin to reduce excess fat, then combine the bones with fresh vegetables and water as you would for any batch. Because rotisserie birds are usually well seasoned, taste the finished broth before adding any extra salt.
How should I store and reheat pressure cooker bone broth safely ?
Cool strained broth quickly in shallow containers, then refrigerate and use within five days or freeze for up to three months. Reheat only the amount you need to a gentle simmer on the stove or in the microwave, and avoid repeatedly reheating the same batch, which can degrade flavor and texture. Always discard broth that smells off, looks cloudy in an unusual way, or has been left at room temperature for more than two hours.